> For the complete documentation index, see [llms.txt](https://docs.didomi.io/llms.txt). Markdown versions of documentation pages are available by appending `.md` to page URLs; this page is available as [Markdown](https://docs.didomi.io/integrations/marketing-automation/mailchimp.md).
# Mailchimp
The Didomi platform now offers an integration with Mailchimp. Thanks to this integration, you can synchronize the preferences of your users collected on the PMP with your Mailchimp contacts.
{% hint style="info" %}
* This is a premium feature.
* You must be a Didomi and Mailchimp customer.
{% endhint %}
### **Use Cases**
* **Maximize targeted marketing performance:** use the data collected through the PMP to reach out to the right audience, in the preferred channel with the right content to enhance the targeted marketing performance.
* **Personalized user experience:** provide users with a good experience to gain trust and (up)sell more.
* **Save cost & improve your marketing ROI:** Optimize the consistency of your marketing campaigns with reliable consent data and get a better return on investment.
### **Enable Mailchimp Integration**
To enable the integration of Mailchimp, you need to send the following elements to our support team:
* API Key
* Audience ID
* Property ID
* Property values
1. Go to your Mailchimp account.
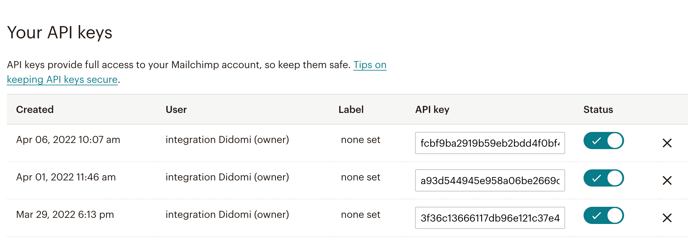
2. Go to the **API Key** section.
3. Copy the **API Key** or create a new one. If you would like more information, you can check Mailchimp’s documentation [here](https://mailchimp.com/developer/marketing/guides/quick-start/#generate-your-api-key).
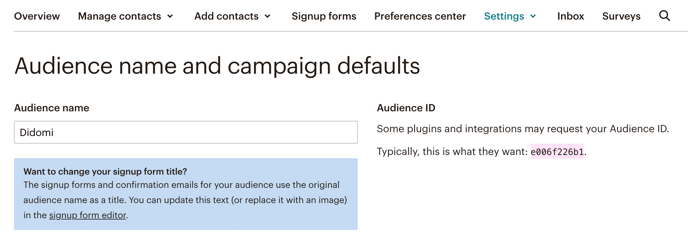
4. Go to **Audience** > **All Contacts** > **Settings** > **Audience Name** **and defaults** to get your Audience ID.
5. Go to **Audience** > **All Contacts** > **Settings** > **Audience fields and \*|MERGE|\* tags** to define your property ID.
6. Scroll to the bottom of the page.
7. Click on **Add field**.
8. Choose **type = text**.
9. Enter a name for the audience field (first column).
10. In the below highlighted field enter a value: this value will be the property id to configure in the integration.
11. Finally, you need to define property values. For this step, we recommend you to check our [developers documentation](https://developers.didomi.io/integrations/preference-management-platform-integrations/mailchimp).
If you like any further information, do not hesitate to contact our support team ().
---
# Agent Instructions
This documentation is published with GitBook. GitBook is the documentation platform designed so that both humans and AI agents can read, navigate, and reason over technical content effectively. Learn more at gitbook.com.
## Querying This Documentation
If you need additional information that is not directly available in this page, you can query the documentation by asking a question.
Perform an HTTP GET request on the following URL with the `ask` and `goal` query parameters:
```
GET https://docs.didomi.io/integrations/marketing-automation/mailchimp.md?ask=&goal=
```
`ask` is the immediate question: it should be specific, self-contained, and written in natural language.
`goal` is what the user is ultimately trying to achieve, the reason they need the answer. Sharing it helps GitBook give you a better, more relevant answer. A goal is most helpful when it describes the outcome the user wants rather than restating the question. For example, with `ask=how do I create an API token`, a goal like `automate deployments from our CI pipeline` lets GitBook tailor the answer to that use case.
The response will contain a direct answer to the question and relevant excerpts and sources from the documentation.
Use this mechanism when the answer is not explicitly present in the current page, you need clarification or additional context, or you want to retrieve related documentation sections.