> For the complete documentation index, see [llms.txt](https://docs.didomi.io/llms.txt). Markdown versions of documentation pages are available by appending `.md` to page URLs; this page is available as [Markdown](https://docs.didomi.io/integrations/google/block-tags-with-google-tag-manager-integration.md).
# Block tags with Google Tag Manager integration
This article will guide you through Didomi's integration with Google Tag Manager (GTM) to configure the loading of tags on your website when there is consent from the user.
### Introduction: events and variables sent in the Data Layer
The GTM integration enables the Didomi SDK to send events. These events can generate variables in the GTM Data Layer.
* **Didomi Events**
{% hint style="info" %}
**didomi-consent:** when page has loaded, and when there is a change in consent
**didomi-ready**: when the page is loaded
**didomi-consent-changed**: when there is a change in consent
{% endhint %}
We recommend using the **didomi-consent** event as it includes the others and is usually the most suitable.
You can find these events in our 📰 [technical documentation](https://developers.didomi.io/cmp/web-sdk/third-parties/custom-integrations/tag-managers/google-tag-manager#what-events-are-available).
* **Didomi Variables**
Didomi events will generate Didomi variables in the GTM Data Layer.
{% hint style="info" %}
Didomi variables include the following information:
* Vendors (subset variables: consent given/ consent denied/ consent unknown)
* Purposes (subset variables: consent given/ consent denied/ consent unknown)
* Vendors and purposes (subset variables: consent given/ consent denied/ consent unknown)
* IAB TCF Consent string / GDPR (if GPDR applies)
{% endhint %}
You do not have to use all variables. The most used variable is "**didomiVendorsEnabled**", which holds the list of all vendors with user consent.
You can find the variables 📰 [here](https://developers.didomi.io/cmp/web-sdk/third-parties/tags-management/events-and-variables).
The goal here is to use these events and variables in the triggers you create, in order to activate tag loading only if the user has given consent. A trigger is activated depending on the event and the variable.
### **Integration**
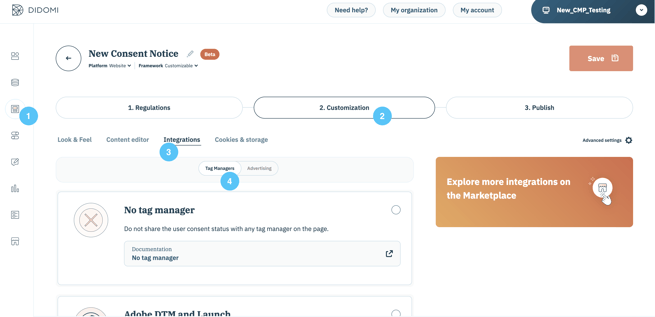
To get started, you need to activate the GTM integration when you set up your consent notice.
1. Go to **Consent notices (1)** and click to **edit** your notice.
2. Go to step **2. Customization** **(2)** and the **Integrations** tab **(3)**.
3. Make sure you are in the **Tag Managers** section **(4)**.
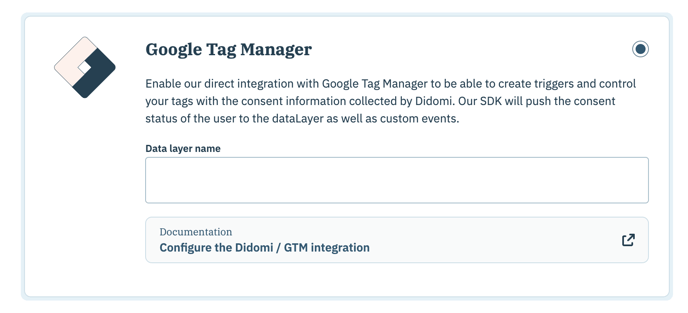
4. Scroll down to select the **Google Tag Manager** integration.
5. In the **Data Layer Name** field, write the name of your [data layer](https://support.google.com/tagmanager/answer/6164391?hl=en#:~:text=A%20data%20layer%20is%20a,developer%20documentation%20for%20more%20information\)).
6. The standard name "dataLayer" is used by default.
7. If you keep the standard name you can leave the field as is.
8. If you chose a new name, you can see it in the code of your website (ask your tech team).
9. If you didn't use the Console to create your consent notice, add this in the object didomiConfig:\
tagManager: {\
\
provider: 'gtm'\
\
}
10. Do not add this code if you have checked the box in the console.
### **Create a variable**
1. Go to your Google Tag Manager account.\
👉 Let's begin by creating a variable "didomiVendorsEnabled" (i.e., the most commonly used variable). This will enable you to set up tag loading when consent is given by a user for each vendor.
2. Click on **Folders** in the left menu.
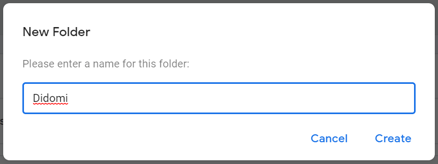
3. Click on **New Folder.**
4. Name your folder "Didomi".
5. Click on the three dots to the left of the Didomi file.
6. Click on **Add a variable**.
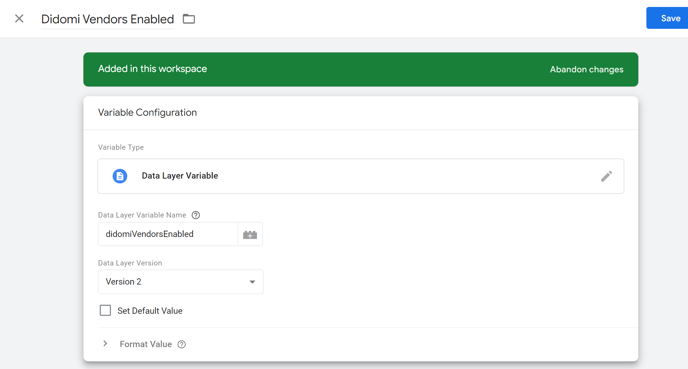
7. Enter this information:
**Name:** Didomi Vendors Enabled (instead of “variable without title”)\
**Type of Variable**: Variable of the Data Layer (use the pencil icon to open the choice menu).\
**Name of Data Layer variable**: didomiVendorsEnabled
### **Create triggers**
You will now create triggers and connect these triggers to one of the Didomi events (we recommend using didomi-consent) and to the "Didomi Vendors Enabled" variable (created in the previous step).
You will need to create a trigger for **each** non-IAB vendor that you wish to block.
To create a trigger:
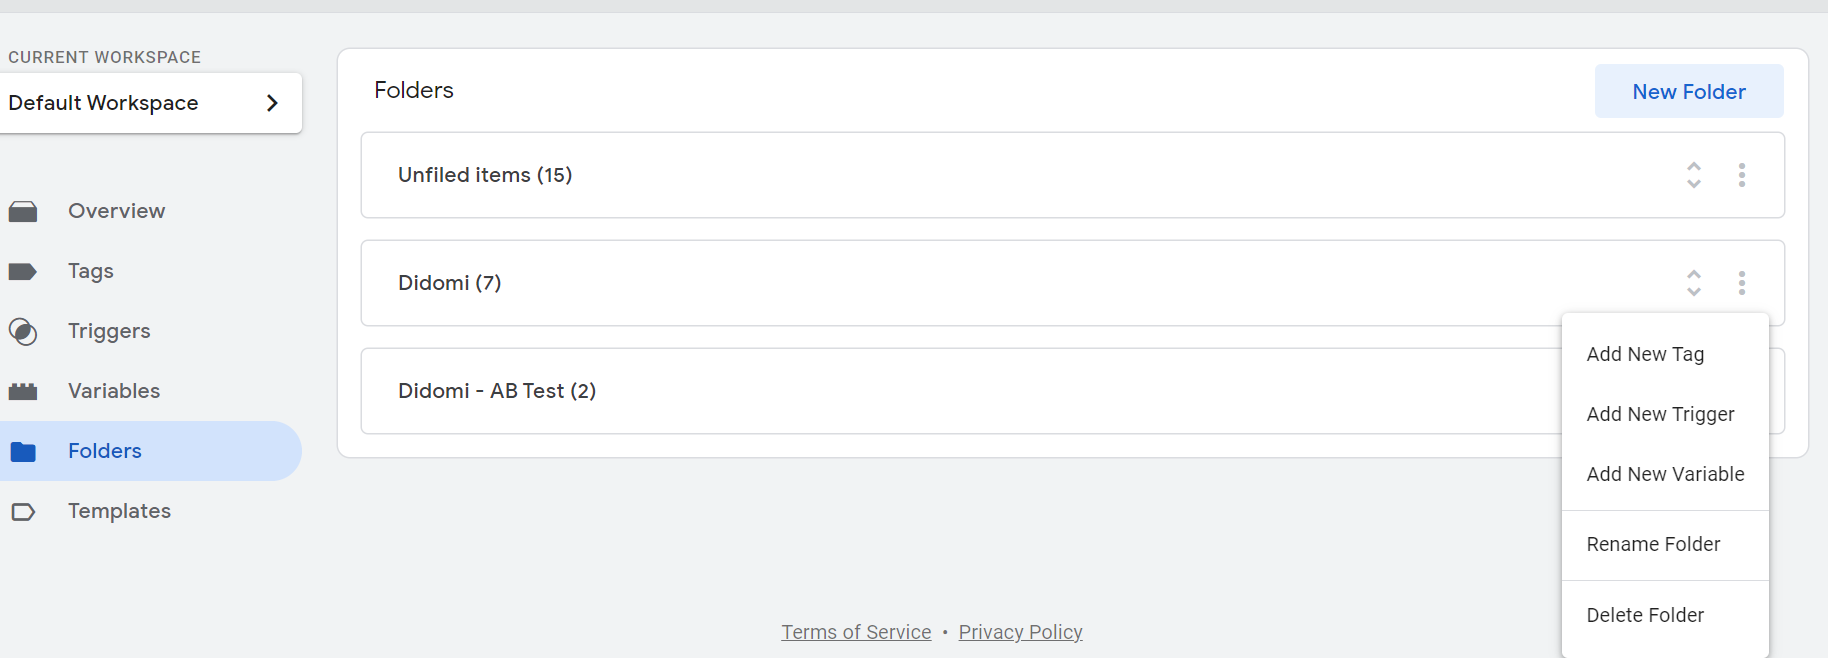
1. Click on **Folders** in the left menu.
2. Click on the three dots to the right of the Didomi file.
3. Click on **Add New trigger**.
4. Enter this information:
{% hint style="info" %}
**Name of the trigger**: "{Vendor name} – Didomi", for example\
\&#xNAN;*Replace what is written between the curly brackets {} with the name of the corresponding vendor and make sure to remove the {}.*\
The name has no impact. You can use whatever name you prefer.\
\
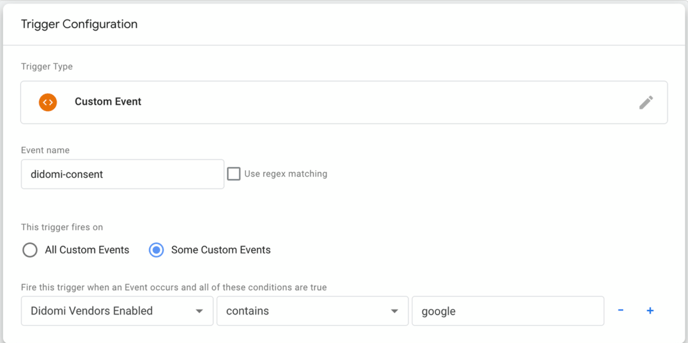
**Type of trigger**: custom event (use the pencil icon to open the choice menu)\
\
**Name of the event**: [one of the events generated by Didomi](https://developers.didomi.io/cmp/web-sdk/third-parties/custom-integrations/tag-managers/google-tag-manager#events) (didomi-consent, didomi-ready or didomi-consent-changed). We recommend using didomi-consent.\
\&#xNAN;**"Conditions in which the trigger can be executed"** and select “Some custom events”.\
\
\&#xNAN;**"Fire this trigger when an event occurs and all of these conditions are true"**: Didomi Vendors Enabled contains {ID vendor}\
\
\&#xNAN;*Replace what is written between the curly brackets {} with the corresponding vendor ID: cf. “Where to find the vendor ID?” further down in this article.*
{% endhint %}
**Repeat for all non-IAB vendors.** You need to create one trigger **per** non-IAB vendor.
👉If your existing trigger is a personalised trigger, you need to "[create a group of triggers"](https://support.google.com/tagmanager/answer/9164222?hl=fr) so that the tag is activated when condition 1 (the existing one) and condition 2 (the one linked to consent) **both meet**.
👉If you add both the existing trigger linked to consent AND the existing trigger to the tag, the latter will be launched when the condition 1 OR 2 is valid. Do not use both at the same time, as this causes cookies to be dropped before/without consent (non-compliant).
To create a group of triggers:
1. Click on **Folders** in the left menu.
2. Click on the three dots of the Didomi file, and **Add new trigger**.
3. Enter this information:
**Name of trigger group:** "Group of triggers – Consent + {name of the other condition} - {vendor name}", for example\
\&#xNAN;*Replace what is written between the curly brackets {} with the corresponding information (and remove the {}).*\
The name of the trigger group has no impact, you can use whatever name you prefer.
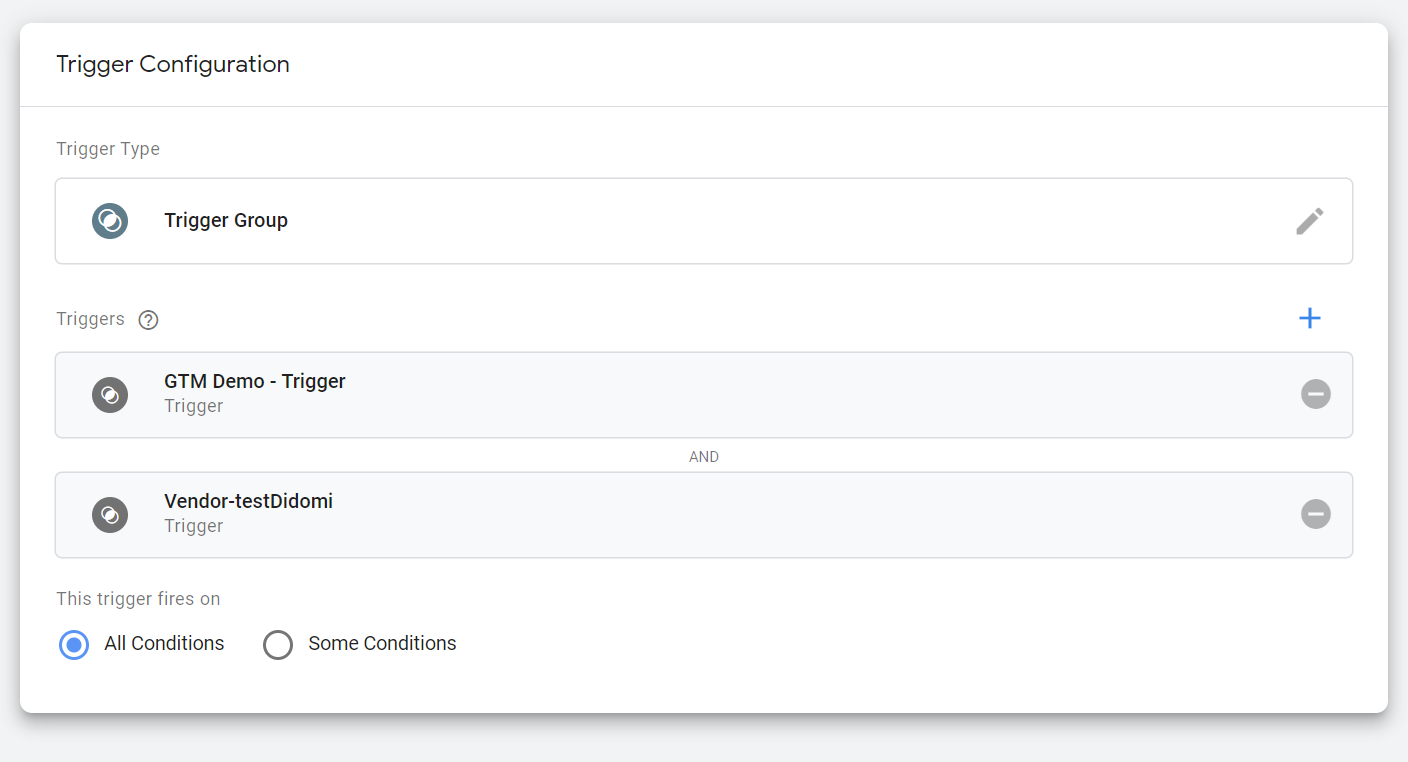
**Type of trigger**: click on the pencil icon and choose "**Group of triggers**".
Click on , to the right of **Triggers**.\
Select the existing trigger for your tag.\
Click on  again.\
Select the Didomi trigger matching the vendor, previously created (cf. previous step).
4. **Save**.
👉This trigger (or group of triggers) can now be used in tags so they are activated whenever the user gives his consent for this vendor.
Trigger groups are triggered once per page only. This can be problematic when using dynamic websites. In such case, you can use Didomi [functions](https://developers.didomi.io/cmp/web-sdk/reference/api) and [events](https://developers.didomi.io/cmp/web-sdk/third-parties/custom-integrations/tag-managers/google-tag-manager/configure-the-didomi-gtm-integration#events). Specifically for SPA, please refer to our dedicated [GitHub page](https://github.com/didomi/samples/tree/main/how-to-track-SPA-with-GTM-and-Didomi).
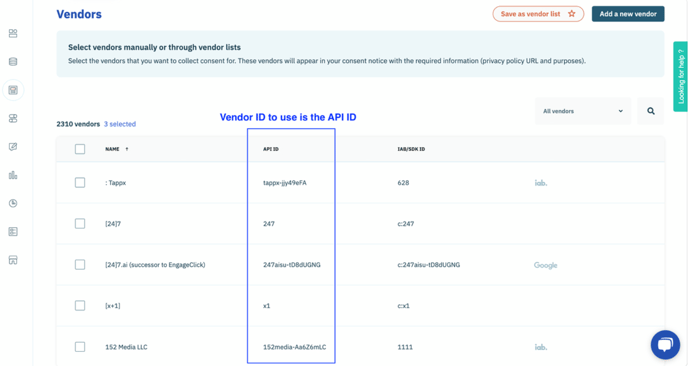
#### **Where to find the vendor ID?**
To find the vendor ID, go to step **1. Regulations**, then the **Regulations** tab and **Edit Vendors and Purposes** under each regulation. You can select and copy the API ID .
#### **Match the trigger to the tag**
Finally, you need to connect the trigger to its tag. **This last step is very important.**
In the **Tags** section of your GTM account:
1. Click on one of your existing tags for a non-IAB vendor.
2. Add the trigger or the group of triggers (created previously) matching with the vendor of the tag, instead of the trigger used previously.
3. **Save**.
{% hint style="danger" %}
**Repeat for EACH of the existing triggers for non-IAB vendors.**
Remember to set up the tags for **all** your containers.
From now on, each time you add a new tag for a non-IAB vendor requiring GDPR- compliant consent, you need to go through the setup and tick this new vendor in the list displayed in the console.
{% endhint %}
---
# Agent Instructions
This documentation is published with GitBook. GitBook is the documentation platform designed so that both humans and AI agents can read, navigate, and reason over technical content effectively. Learn more at gitbook.com.
## Querying This Documentation
If you need additional information that is not directly available in this page, you can query the documentation dynamically by asking a question.
Perform an HTTP GET request on the current page URL with the `ask` query parameter, and the optional `goal` query parameter:
```
GET https://docs.didomi.io/integrations/google/block-tags-with-google-tag-manager-integration.md?ask=&goal=
```
`ask` is the immediate question: it should be specific, self-contained, and written in natural language.
`goal` is optional and describes the broader end goal you are ultimately trying to accomplish on behalf of the user. GitBook uses it to tailor the answer towards what is most useful for that goal.
The response will contain a direct answer to the question and relevant excerpts and sources from the documentation.
Use this mechanism when the answer is not explicitly present in the current page, you need clarification or additional context, or you want to retrieve related documentation sections.


 1. Click on one of your existing tags for a non-IAB vendor.
2. Add the trigger or the group of triggers (created previously) matching with the vendor of the tag, instead of the trigger used previously.
3. **Save**.
{% hint style="danger" %}
**Repeat for EACH of the existing triggers for non-IAB vendors.**
Remember to set up the tags for **all** your containers.
From now on, each time you add a new tag for a non-IAB vendor requiring GDPR- compliant consent, you need to go through the setup and tick this new vendor in the list displayed in the console.
{% endhint %}
---
# Agent Instructions
This documentation is published with GitBook. GitBook is the documentation platform designed so that both humans and AI agents can read, navigate, and reason over technical content effectively. Learn more at gitbook.com.
## Querying This Documentation
If you need additional information that is not directly available in this page, you can query the documentation dynamically by asking a question.
Perform an HTTP GET request on the current page URL with the `ask` query parameter, and the optional `goal` query parameter:
```
GET https://docs.didomi.io/integrations/google/block-tags-with-google-tag-manager-integration.md?ask=
1. Click on one of your existing tags for a non-IAB vendor.
2. Add the trigger or the group of triggers (created previously) matching with the vendor of the tag, instead of the trigger used previously.
3. **Save**.
{% hint style="danger" %}
**Repeat for EACH of the existing triggers for non-IAB vendors.**
Remember to set up the tags for **all** your containers.
From now on, each time you add a new tag for a non-IAB vendor requiring GDPR- compliant consent, you need to go through the setup and tick this new vendor in the list displayed in the console.
{% endhint %}
---
# Agent Instructions
This documentation is published with GitBook. GitBook is the documentation platform designed so that both humans and AI agents can read, navigate, and reason over technical content effectively. Learn more at gitbook.com.
## Querying This Documentation
If you need additional information that is not directly available in this page, you can query the documentation dynamically by asking a question.
Perform an HTTP GET request on the current page URL with the `ask` query parameter, and the optional `goal` query parameter:
```
GET https://docs.didomi.io/integrations/google/block-tags-with-google-tag-manager-integration.md?ask=