> For the complete documentation index, see [llms.txt](https://docs.didomi.io/llms.txt). Markdown versions of documentation pages are available by appending `.md` to page URLs; this page is available as [Markdown](https://docs.didomi.io/integrations/content-management-system-cms/shopify-beta.md).

# Shopify (beta)

Shopify is a cloud-based e-commerce platform that lets businesses of all sizes build and manage online stores, handle payments, and sell across multiple channels. Didomi has a native application available in the Shopify App Store that enables your organization to quickly deploy the Didomi CMP on a Shopify store. In this article, we will cover:

* [Prerequisites](#prerequisites)
* [Shopify consent categories](#shopify-consent-categories)
* [Install Didomi application on Shopify store](#install-didomi-application-on-shopify-store)
* [Connect Didomi account to Shopify](#connect-didomi-account-to-shopify)
* [Configure Shopify consent notice settings](#configure-shopify-consent-notice-settings)
* [Configure Data sharing opt-out page - U.S. privacy regulations](#configure-data-sharing-opt-out-page-u.s.-privacy-regulations)
* [Configure pixel permissions](#configure-pixel-permissions)
* [Test Shopify integration](#test-shopify-integration)
* [Resources](#resources)

***

### Prerequisites

Before continuing please ensure that your organization has satisfied the following prerequisites:&#x20;

* Shopify account
* Didomi account
* Published Didomi consent notice

### Shopify consent categories

In the table below, find additional information regarding [Shopify's Customer Privacy API](https://shopify.dev/docs/api/customer-privacy) and the consent categories that it supports. During the configuration of the Didomi app for Shopify, your organization will map purposes in your consent notice to these Shopify consent categories.

{% hint style="info" %}
Didomi automatically maps IAB purposes to Shopify consent categories by default. [Click here](/integrations/content-management-system-cms/shopify-beta/shopify-default-mapping.md) for more information.
{% endhint %}

<table><thead><tr><th width="220">Shopify consent purpose</th><th>Description</th></tr></thead><tbody><tr><td>Analytics</td><td>Cookies to understand how customers interact with the site.</td></tr><tr><td>Marketing</td><td>Cookies to provide ads and marketing communications based on customer interests.</td></tr><tr><td>Preferences</td><td>Cookies that remember customer preferences, such as country or language, to personalize visits to the website.</td></tr><tr><td>Sale of Data</td><td>Indicates whether the store can share a visitorʼs data with third-parties (recommended for US specific purposes only). Click here for more information</td></tr></tbody></table>

{% hint style="warning" %}
**Note**: In addition to the above Shopify consent categories, your organization can also map essential/required consent notice purposes to an **Always Required** category.&#x20;
{% endhint %}

### Install Didomi application on Shopify store

Log into your organization's Shopify account with your credentials.

<figure><img src="/files/hxeFLWoKSm2kAvp8toyc" alt="" width="375"><figcaption></figcaption></figure>

From the admin portal of a Shopify store, click **+ Add** on the left-hand panel underneath the ***Apps*** header.

<figure><img src="/files/uT4kzsa9fgburwd92n8T" alt="" width="563"><figcaption></figcaption></figure>

Click the **Shopify App Store** link.

<figure><img src="/files/paVsSBz3uUEygTgQ3QNr" alt="" width="563"><figcaption></figcaption></figure>

Use the provided search field to search for **Didomi Cookie Consent** and select it from the results. Click **Install** on the page and follow any subsequent instructions.

<figure><img src="/files/LtBK9WFFHgxu83xgcJjR" alt="" width="563"><figcaption></figcaption></figure>

The Didomi CMP application will be available under the ***Apps*** header in the left-hand panel.

<figure><img src="/files/rAZJn5ziQ4kHJzHVLzcx" alt="" width="563"><figcaption></figcaption></figure>

### Connect Didomi account to Shopify

Navigate to the **Didomi CMP** app installed on your Shopify store and click **Connect to Didomi** on the subsequent page.

<figure><img src="/files/KKoOIN21tqZMzSEJL39B" alt="" width="563"><figcaption></figcaption></figure>

If not yet logged into your Didomi account, follow the prompts to log into your organization's Didomi account.

<figure><img src="/files/ISChzl8kNyG9sfz5sFud" alt="" width="375"><figcaption></figcaption></figure>

Once your user account has been authenticated, use the provided drop-down menu to select the organization you wish to connect to your Shopify store. Click **Connect this organization** when finished.

<figure><img src="/files/eVeJguZ3E4570yw1pcnf" alt="" width="375"><figcaption></figcaption></figure>

### Configure Shopify consent notice settings

With your organization's Didomi account connected to Shopify, you can now select and configure a Didomi consent notice to launch on your Shopify store. To start, navigate to the **Choose Theme** tab and use the provided drop-down menu to select a theme with an **Active** status.

{% hint style="info" %}
A Shopify theme is a customizable website template that defines the layout, design, and functionality of an online store. [Click here](https://help.shopify.com/en/manual/online-store/themes) for more information.
{% endhint %}

<figure><img src="/files/0Xu7mw3MvjpL64f5axtB" alt="" width="563"><figcaption></figcaption></figure>

{% hint style="warning" %}
The Didomi consent notice will only display when it is configured for a theme that has an **Active** status.
{% endhint %}

After a theme is selected, navigate to the left-hand panel and select **Settings** underneath the Didomi app section.

<figure><img src="/files/xFZN9h76BCHsPBgKiUcj" alt="" width="563"><figcaption></figcaption></figure>

On the subsequent ***Settings*** page, the **Select a notice** panel will list all published Didomi consent notices for your organization. Use the provided search field to locate your desired consent notice and select it by clicking the radio button to the left of the notice name.

<figure><img src="/files/Gg4KIZ1pthkmisJLivyg" alt="" width="563"><figcaption></figcaption></figure>

With a consent notice selected, navigate to the **Purpose mapping** panel. For each purpose included in the consent notice, select a [Shopify consent category](#shopify-consent-categories) that should be mapped to the purpose.

Multiple consent notice purposes can be mapped to the same Shopify consent category and the end-user's decision on purposes will determine whether the Shopify consent category is set to `true|yes` or `false|no` in the Shopify Customer Privacy API.

{% hint style="warning" %}
**Note**: In order for a Shopify consent category to be `true|yes` **all** purposes in your consent notice mapped to the Shopify consent category must be accepted by the end-user. If one or more consent notice purposes is rejected/declined by the end-user then the Shopify consent category to which they are mapped will be set to `false|no`.
{% endhint %}

<figure><img src="/files/80O2ydGKNd4cXbzHk7g0" alt="" width="563"><figcaption></figcaption></figure>

All consent notice purposes will need to be mapped to a Shopify consent category. However, not all Shopify consent categories need to be included in the mapping. Click **Save** when finished.

{% hint style="info" %}
If a consent notice purpose is not mapped then the consent notice will not display in your Shopify store. [Click here](/integrations/content-management-system-cms/shopify-beta/troubleshoot-shopify-integration.md) for more information.

This condition **does not** impact the display of a [checkout banner](/integrations/content-management-system-cms/shopify-beta/shopify-checkout-banner.md).
{% endhint %}

<figure><img src="/files/252YBqrBfkhomm748hLn" alt="" width="563"><figcaption></figcaption></figure>

The selected consent notice will be displayed on your Shopify store in the [region(s)](/integrations/content-management-system-cms/shopify-beta/configure-shopify-consent-notice-region-s.md) you have configured in the Didomi console for the consent notice.&#x20;

### Configure Data sharing opt-out page - U.S. privacy regulations

{% hint style="warning" %}
**Note**: The Sale of data consent category is typically used to support United States privacy regulations. Before starting, ensure at least one purpose in your Didomi consent notice is mapped to the Sale of data consent category.
{% endhint %}

If your organization targets end-users in the United States where data sale regulations apply (e.g. California), you can enable the Shopify opt-out mechanism that will add a link and page to your store so that end-users can easily prevent their data from being shared to third-parties.&#x20;

Click **Settings** on the left-hand panel of the admin view of your Shopify store.

<figure><img src="/files/CMWHFzabqLxUof81T9d0" alt="" width="563"><figcaption></figcaption></figure>

Select **Customer privacy** on the left-hand panel and then click **Data sharing opt out page**.

<figure><img src="/files/XQqpJV1hwHxkr0BH0xs6" alt="" width="563"><figcaption></figcaption></figure>

On the following page, use the **Regions and content** section to select where the opt-out page is active and the content of the opt-out page. Your organization can choose from Shopify's automated settings or to manually configure the applicable regions and content of the opt-out page.

<figure><img src="/files/MdIHvZCa3JnnMY7u2O80" alt="" width="563"><figcaption></figcaption></figure>

Next, navigate to the **Navigation** section and use the provided drop-down menu to select where the link to the opt-out page should be for end-users in the applicable regions.&#x20;

Click **Save** when finished to confirm the edits.

<figure><img src="/files/dRpDYFNnc6u9uKjzal8q" alt="" width="563"><figcaption></figcaption></figure>

### Configure pixel permissions

A pixel is a small snippet of code embedded on a webpage or in an app that sends data to a third-party server when triggered, typically to track user behavior, measure ad conversions, or enable re-targeting.&#x20;

With the consent notice successfully added and configured in your Shopify store, your organization will now need to set the permissions for any pixels that require consent data so that they only fire when the appropriate Shopify consent categories are enabled.

{% hint style="info" %}
Before continuing, ensure that the consent regions for the consent notice are aligned within the Didomi console and Shopify. [Click here](/integrations/content-management-system-cms/shopify-beta/configure-shopify-consent-notice-region-s.md) for more information.
{% endhint %}

To set the permissions of a pixel, click **Settings** on the left-hand panel of the admin view of your Shopify store.

<figure><img src="/files/CMWHFzabqLxUof81T9d0" alt="" width="563"><figcaption></figcaption></figure>

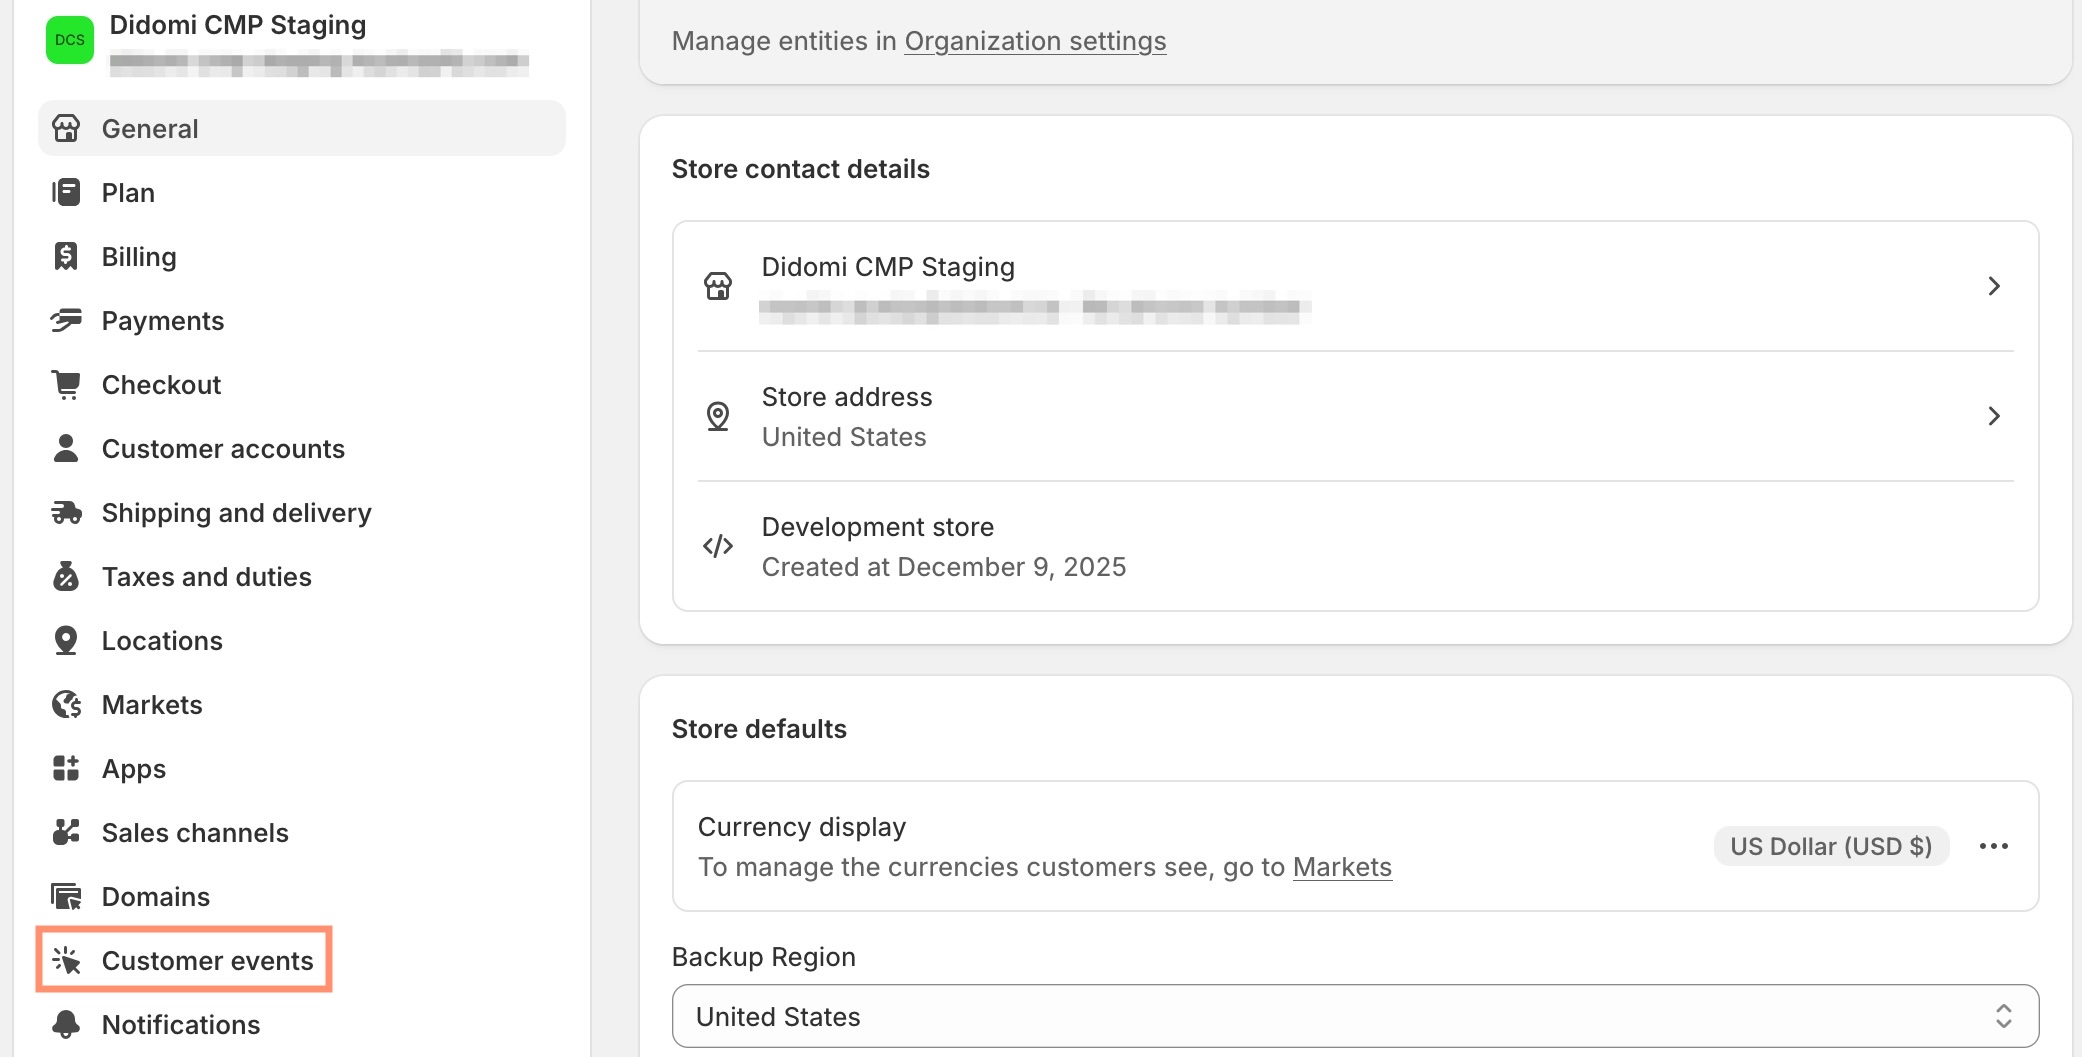
Select **Customer events** on the left-hand panel of the subsequent page.

<figure><img src="/files/nOz8Rp19LrrREXdz78mn" alt="" width="563"><figcaption></figcaption></figure>

Use the provided workflows to either add a custom pixel or select an existing pixel on the list.

<figure><img src="/files/mBOp1yIES2l5btniYfsl" alt="" width="563"><figcaption></figcaption></figure>

Navigate to the Customer privacy section for the pixel and expand the accordions for **Permission** and **Data sale**.

Use the provided fields to set the Shopify consent categories that need to be enabled by the end-user for the pixel to trigger successfully. Review the table for more information:

{% hint style="info" %}
If the pixel requires permission for more one than one consent category (e.g. Marketing, Analytics, and Data collected qualifies as data sale) then the pixel will only fire once the end-user has performed the required actions to enable the consent signal (`yes`) for all of the selected permissions.
{% endhint %}

<table><thead><tr><th width="169">Shopify consent category</th><th width="121">Legal basis</th><th>Description</th></tr></thead><tbody><tr><td>Marketing<br>Analytics<br>Preferences</td><td>Opt-in</td><td>These consent categories are set to <code>no</code> by default and are only set to <code>yes</code> when the end-user selects the purpose in the consent notice that is mapped to the respective category.</td></tr><tr><td>Sale of data (Data collected qualifies as data sale)</td><td>Opt-out</td><td><p>When either of the following permissions is enabled for the pixel the consent category is set to <code>yes</code> by default: </p><p></p><ul><li>Data collected qualifies as data sale</li><li>Data collected qualifies as data sale and supports limited data use</li></ul><p></p><p>In order to set the Sale of data consent category to <code>no</code> the end-user will need to either:</p><p></p><ul><li>Reject the purpose that is mapped to the Sale of data consent category in the Shopify store consent notice</li><li>Reject the Sale of Data consent category in the Shopify checkout banner </li></ul><div data-gb-custom-block data-tag="hint" data-style="warning" class="hint hint-warning"><p><strong>Note</strong>: The Sale of data consent category is typically used to support United States privacy regulations. For pixels that rely on the Sale of data consent category to behave correctly, ensure at least one purpose in your Didomi consent notice is mapped to the Sale of data consent category.</p></div></td></tr></tbody></table>

Click **Save** when finished.

<figure><img src="/files/rfGxJQxpOMPvO4qVhiaC" alt="" width="563"><figcaption></figcaption></figure>

### Test Shopify integration

Navigate to your organization's Shopify store and confirm the following tests:

* [Consent notice not displayed in excluded regions](#consent-notice-not-displayed-in-excluded-regions)
* [Didomi consent signals](#didomi-consent-signals)
* [Shopify consent categories](#shopify-consent-categories-1)

#### Consent notice not displayed in excluded regions

From the end-user's experience of your Shopify store, verify that the consent notice does not appear in [region(s)](/integrations/content-management-system-cms/shopify-beta/configure-shopify-consent-notice-region-s.md) that have been excluded in the Didomi consent notice configuration.

When a region is excluded (and therefore the consent notice is not displayed), your organization can open the browser's developer tools and use the following method calls to verify the expected output for the Didomi API and Shopify Customer Privacy API, respectively.

{% tabs %}
{% tab title="Didomi " %}
Use the `Didomi.getCurrentUserStatus()` method call to return the current end-user's consent status for Didomi.

Since consent is not required and a consent notice was not displayed, the method call should return an object where consent for all purposes and all vendors are set to `true`.

<figure><img src="/files/nCkdZ8sDdnUvActLCxg0" alt="" width="563"><figcaption></figcaption></figure>
{% endtab %}

{% tab title="Shopify" %}
Use the `Shopify.customerPrivacy.currentVisitorConsent()` method call to return the current end-user's consent status for Shopify.

Since consent is not required and a consent notice was not displayed, the method call should return an object where consent for each Shopify consent category is set to `yes`.

{% hint style="warning" %}
**Note**: If a Shopify consent category was not used in the map between consent notice purposes and Shopify consent categories then that Shopify consent category will return an empty string.&#x20;
{% endhint %}

<figure><img src="/files/PLthix6pSsEF81IHhXzV" alt="" width="563"><figcaption></figcaption></figure>
{% endtab %}
{% endtabs %}

#### Didomi consent signals

For regions where consent collection is necessary (and therefore the region is included and a consent notice is displayed), your organization will want to check that the end-user's consent decisions are captured correctly in the Didomi API.

Navigate to your Shopify store as an end-user and confirm that your selected Didomi consent notice is displayed on the page.

<figure><img src="/files/3BaV2qdY4wIhxhiQorWH" alt="" width="563"><figcaption></figcaption></figure>

Make consent choices via the consent notice and submit the response.&#x20;

Open the browser's developer tools and use the `Didomi.getCurrentUserStatus()` method call to return the current end-user's consent status for Didomi. Ensure that your selections are reflected in the settings in the `purposes` object.&#x20;

<figure><img src="/files/0q5zeEFoq5HxFOY9VGwq" alt="" width="563"><figcaption></figcaption></figure>

#### Shopify consent categories

For regions where consent collection is necessary (and therefore the region is included and a consent notice is displayed), your organization will want to check that the end-user's consent decisions are mapped and captured correctly in the Shopify Customer Privacy API.

Navigate to your Shopify store as an end-user and confirm that your selected Didomi consent notice is displayed on the page.

<figure><img src="/files/3BaV2qdY4wIhxhiQorWH" alt="" width="563"><figcaption></figcaption></figure>

Make consent choices via the consent notice and submit the response.&#x20;

Open the browser's developer tools and use the `Shopify.customerPrivacy.currentVisitorConsent()` method call to return the current end-user's consent status for the Shopify Customer Privacy API. Ensure that your selections are reflected in the Shopify consent categories as [configured in the mapping](#configure-shopify-consent-notice-settings) performed between Didomi consent purposes and Shopify consent categories.

{% hint style="warning" %}
**Note**: In order for a Shopify consent category to be `yes` all purposes in your consent notice mapped to the Shopify consent category must be accepted by the end-user. If one or more consent notice purposes is rejected/declined by the end-user then the Shopify consent category to which they are mapped will be set to `no`.

Additionally, if a Shopify consent category was not used in the map between consent notice purposes and Shopify consent categories then that Shopify consent category will return as an empty string.&#x20;
{% endhint %}

<figure><img src="/files/FhVqBN9kIPGxejXpOGK7" alt="" width="563"><figcaption></figcaption></figure>

***

### Resources

See the following articles for more information on configuring your Didomi integration with Shopify:

* [Configure Shopify consent notice region(s)](/integrations/content-management-system-cms/shopify-beta/configure-shopify-consent-notice-region-s.md)
* [Shopify default mapping](/integrations/content-management-system-cms/shopify-beta/shopify-default-mapping.md)
* [Resurface Shopify consent notice](/integrations/content-management-system-cms/shopify-beta/resurface-shopify-consent-notice.md)
* [View Shopify integration](/integrations/content-management-system-cms/shopify-beta/view-shopify-integration.md)
* [Disconnect Shopify store](/integrations/content-management-system-cms/shopify-beta/disconnect-shopify-store.md)
* [Add purpose to Shopify consent notice](/integrations/content-management-system-cms/shopify-beta/add-purpose-to-shopify-consent-notice.md)
* [Shopify checkout banner](/integrations/content-management-system-cms/shopify-beta/shopify-checkout-banner.md)
* [Troubleshoot Shopify integration](/integrations/content-management-system-cms/shopify-beta/troubleshoot-shopify-integration.md)


---

# Agent Instructions
This documentation is published with GitBook. GitBook is the documentation platform designed so that both humans and AI agents can read, navigate, and reason over technical content effectively. Learn more at gitbook.com.

## Querying This Documentation
If you need additional information that is not directly available in this page, you can query the documentation dynamically by asking a question.

Perform an HTTP GET request on the current page URL with the `ask` query parameter, and the optional `goal` query parameter:

```
GET https://docs.didomi.io/integrations/content-management-system-cms/shopify-beta.md?ask=<question>&goal=<endgoal>
```

`ask` is the immediate question: it should be specific, self-contained, and written in natural language.
`goal` is optional and describes the broader end goal you are ultimately trying to accomplish on behalf of the user. GitBook uses it to tailor the answer towards what is most useful for that goal.

The response will contain a direct answer to the question and relevant excerpts and sources from the documentation.

Use this mechanism when the answer is not explicitly present in the current page, you need clarification or additional context, or you want to retrieve related documentation sections.