> For the complete documentation index, see [llms.txt](https://docs.didomi.io/llms.txt). Markdown versions of documentation pages are available by appending `.md` to page URLs; this page is available as [Markdown](https://docs.didomi.io/consent-management-platform-cmp/consent-notices/create-consent-notice-ctv.md).
# Create consent notice (CTV)
{% hint style="info" %}
The console preview is only available for web-based CTV environments.
{% endhint %}
Here is a short guide to help you to create your Consent Notice with the brand-new console flow:
1. Go to the [Didomi console.](http://console.didomi.io)
2. Click on **Consent Notices** **(1)** in the left menu.
3. Click on **Create a notice + (2)** in the top right corner.
🎉 You can now start creating your Consent Notice!
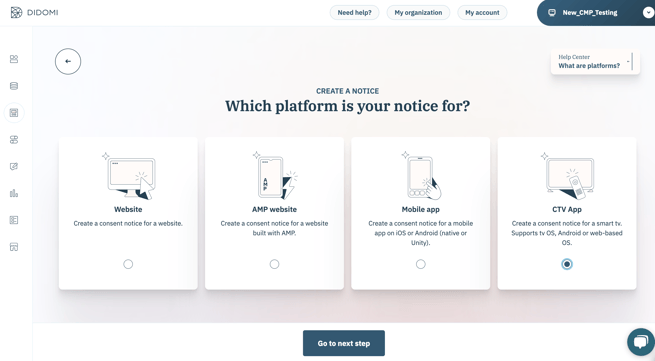
#### **Platforms**
The first step allows you to choose the platform where you want to deploy your notice
1. Select **CTV App**.
2. Click on **Go to next step**.
#### **Preset**
Check out the [Preset section](https://docs.didomi.io/consent-management-platform-cmp/consent-notices/pages/nry1I95q8LAeVbjZEZuE#id-2.-preset) in this documentation.
#### **Regulations**
Check out the [Regulations section](https://docs.didomi.io/consent-management-platform-cmp/consent-notices/pages/nry1I95q8LAeVbjZEZuE#id-3.-regulations) in this documentation.
#### **Customization**
Check out the [Customization section](https://docs.didomi.io/consent-management-platform-cmp/consent-notices/pages/nry1I95q8LAeVbjZEZuE#id-4.-customization) in this documentation.
Note that CTV banners can only be deployed with a bottom sticky banner format. The pop-in format is not available. \
💡 We have a remote control focus customization option.\
By default, the remote control focus will always be set on the first layer text for web-based CTV, and on the 'Select' element for native CTV SDKs (Android TV & tvOS) when creating a CTV consent notice. However, you have the flexibility to customize where the focus is set, directly inside the Didomi console to better fit your needs. \
You can decide to set it on the 'Agree and close' call to action or leave it as it is.
You will find this option in 2.Customization > Look & Feel > "Specific settings" tab:

**✅ Publish**
1. There are two different possible cases:
* Case 1) You were using Didomi before the release of the new console flow (April 2023):
* Add the list of domains where your notice will be embedded.
* Enter your site URL **without "https".**
* Click on the plus sign (**+)** at the right to add your domain.
* You can add as many specific domains as you wish.
* Click on **Publish**.
* Case 2) You are using Didomi since after April 2023:
* You don't need to specify any domain. You just have to click on **Publish** your notice and continue with the tag configuration.
2. Configure your website tags to block vendors by conditioning tag loading on user consent.
* If you use the IAB integration: for IAB vendors, you have nothing to set up. All you have to do is declare them in the vendors section. The consent string allows them to retrieve the user consent status.
* All non-IAB vendors must be clocked, with tag loading made conditional on user consent.
📰For web CTV, please refer to this [documentation](https://developers.didomi.io/cmp/web-sdk/third-parties)
📰 For native CTV, please refer to this [documentation](https://developers.didomi.io/cmp/mobile-sdk/third-party-sdks)
3. Set up **Didomi's SDK** for Android TV (documentation [here](https://developers.didomi.io/cmp/mobile-sdk/android)), tvOS (documentation [here](https://developers.didomi.io/cmp/mobile-sdk/ios)) or [web CTV based ](https://developers.didomi.io/cmp/web-sdk/getting-started#web-based-ctv-application)
4. Click on **Save**.
5. To ensure that your visitors can change their consent preferences at any point in time you will need to add a link to re-open the preferences pop-in in your mobile app. This link can be placed in a menu to make it easier for users to change their preferences. [Read our documentation](https://developers.didomi.io/cmp/mobile-sdk/consent-notice/getting-started#add-a-link-for-the-user-to-manage-their-preferences) to learn more.
---
# Agent Instructions
This documentation is published with GitBook. GitBook is the documentation platform designed so that both humans and AI agents can read, navigate, and reason over technical content effectively. Learn more at gitbook.com.
## Querying This Documentation
If you need additional information that is not directly available in this page, you can query the documentation dynamically by asking a question.
Perform an HTTP GET request on the current page URL with the `ask` query parameter, and the optional `goal` query parameter:
```
GET https://docs.didomi.io/consent-management-platform-cmp/consent-notices/create-consent-notice-ctv.md?ask=&goal=
```
`ask` is the immediate question: it should be specific, self-contained, and written in natural language.
`goal` is optional and describes the broader end goal you are ultimately trying to accomplish on behalf of the user. GitBook uses it to tailor the answer towards what is most useful for that goal.
The response will contain a direct answer to the question and relevant excerpts and sources from the documentation.
Use this mechanism when the answer is not explicitly present in the current page, you need clarification or additional context, or you want to retrieve related documentation sections.